To manage your kitchen displays, you must first register your monitors and define their workflows from the web control panel.
Once the license is activated, log in to the Revo XEF back-office and go to the KDS 2 section.
1. KDS DEVICES
2. GENERAL CONFIGURATION
3. STATUSES
4. STATUS WORKFLOW
5. PROFILES (BEHAVIORS)
6. TIME MANAGEMENT
7. KDS NOTIFICATIONS
Important: As of July 20, 2026, Cegid Revo KDS can be installed and used on any device running Android 7 or higher. However, official technical support is only guaranteed for Cegid Revo certified devices: Sunmi Flex 3 22", Sunmi Flex 3 27", Microtouch M1-215IC 22", and Microtouch M1-270IC 27". Non-certified devices will be identified with a specific indicator in the KDS device list in the back-office. For more information on approved Android monitors, click here.
1. KDS DEVICES
MONITOR REGISTRATION
In this section, we will physically register our kitchen monitors (Access point).
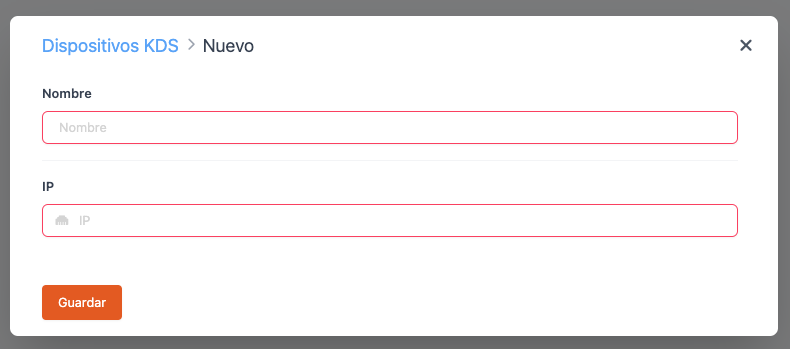
1. Click on New.
2. Assign a descriptive Name to the device (e.g., Cold Prep Tablet).
3. Enter its local IP.
4. Click on Save.
DEVICE INFORMATION IN THE BACK-OFFICE New
Administrators can view real-time technical information by accessing the device file in the web panel. Data sent by the app during its last login (software version, tablet model, and assigned local IP) will be displayed there, making remote maintenance work much easier.

AUDIT AND ACTIVITY LOG New
Every time a terminal selects a work station or changes stations in the app, the action is immediately recorded in the back-office Activity Log. This allows you to audit which device and exact profile were loaded on each screen during daily service.

2. GENERAL CONFIGURATION
GLOBAL DISPLAY SETTINGS
Here, we will configure settings that affect all KDS devices equally.
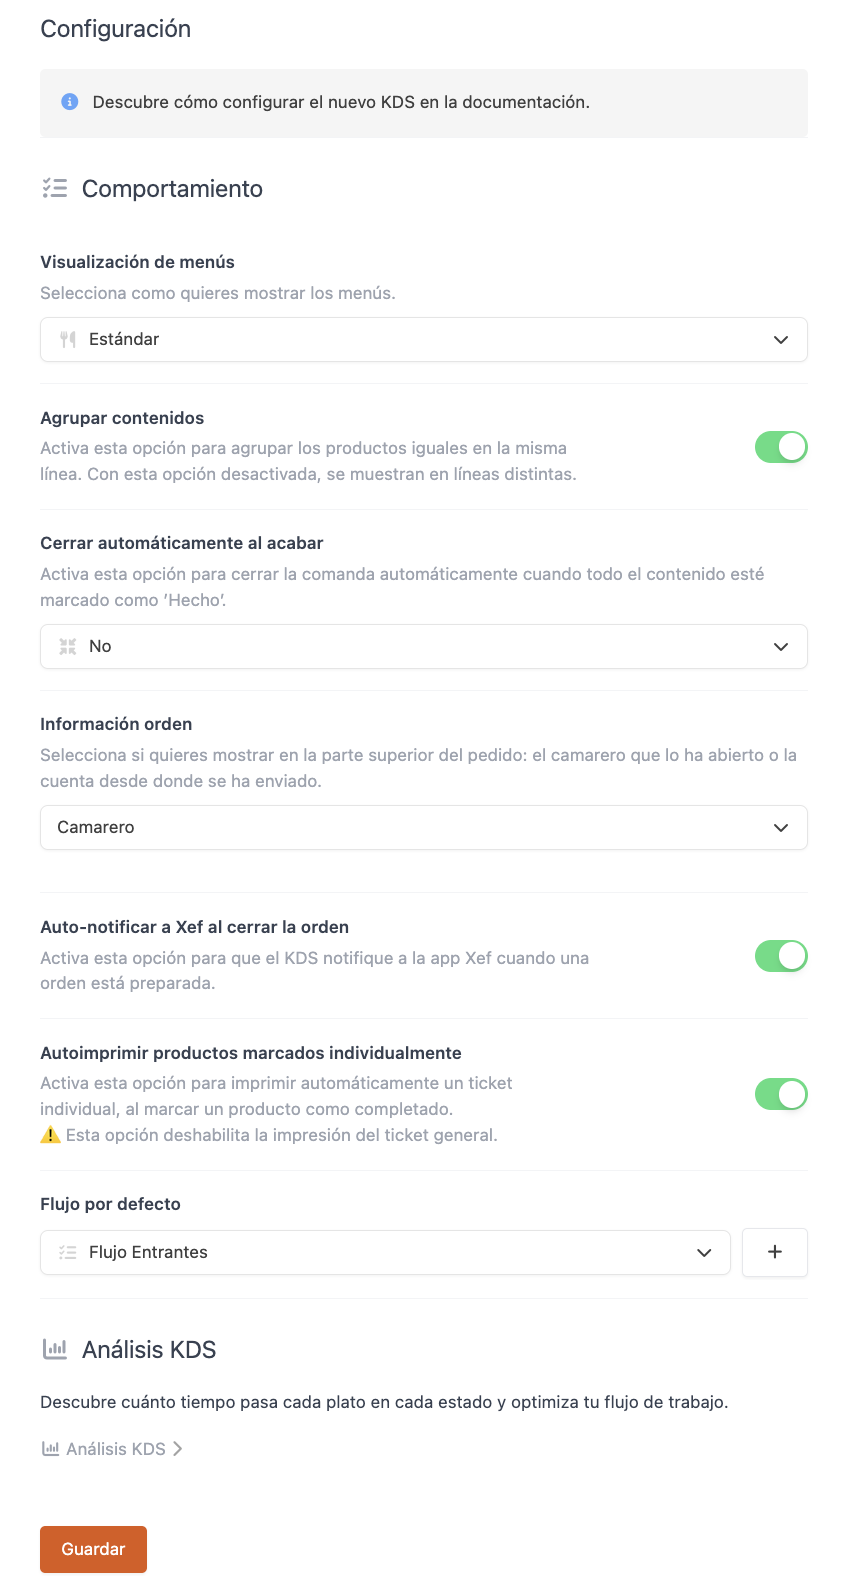
| OPTION | DESCRIPTION |
|---|---|
| Menu display | Standard: Same as Revo XEF. Normal products: Mixes set menu dishes with à la carte dishes on the screen. |
| Group contents | If 2 Burgers are sent, they appear as "2 Burgers" (completed together). If disabled, they appear separately. |
| Auto-close | When marking all dishes as ready, determines whether the order disappears automatically or requests manual confirmation. |
| Order information | Defines whether the ticket header displays the issuing Waiter or the source Account. |
| Auto-notify XEF | When closing an order in KDS, it automatically sends a notification to the floor tablet running Revo XEF. |
| Auto-print products | When marking an individual product as done, it prints a ticket. Disables the general ticket. |
| Default workflow | The standard lifecycle (e.g., Pending → Ready) that all products will follow unless another is specified. |
| KDS Insights | Analytics module to measure service times for each station. |
3. STATUSES
CREATION OF PRODUCTION STAGES
Statuses define the stages a dish goes through (e.g., To Do → On Grill → Finished). When you create your Revo XEF account, you will have 3 generic statuses created by default, but you can customize them.
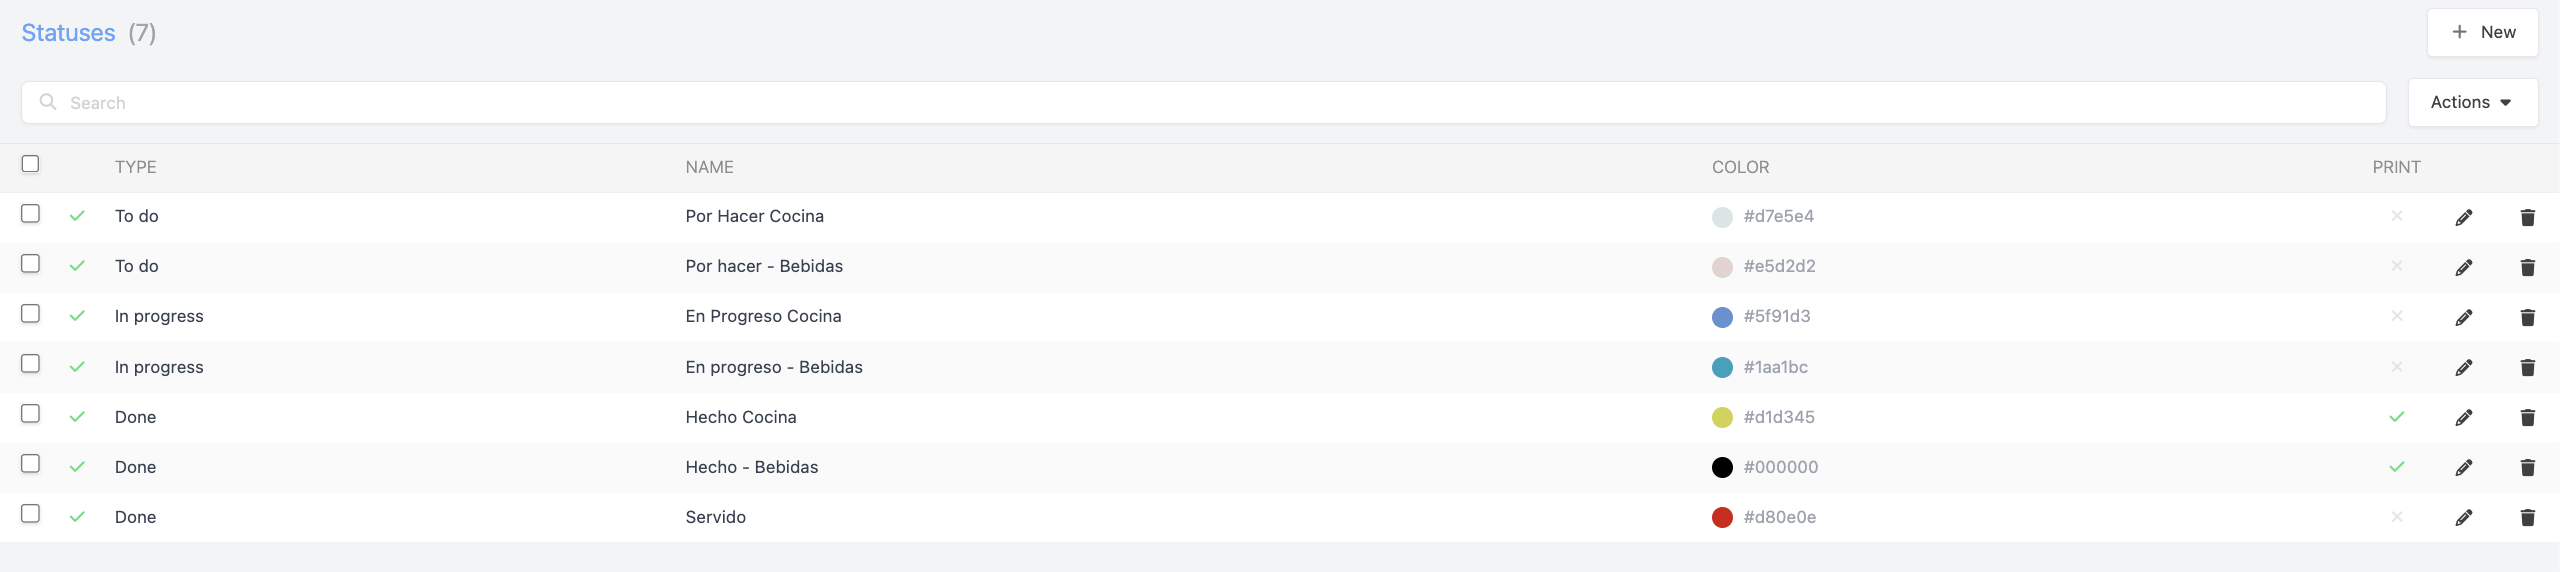
1. Click on New and fill in:
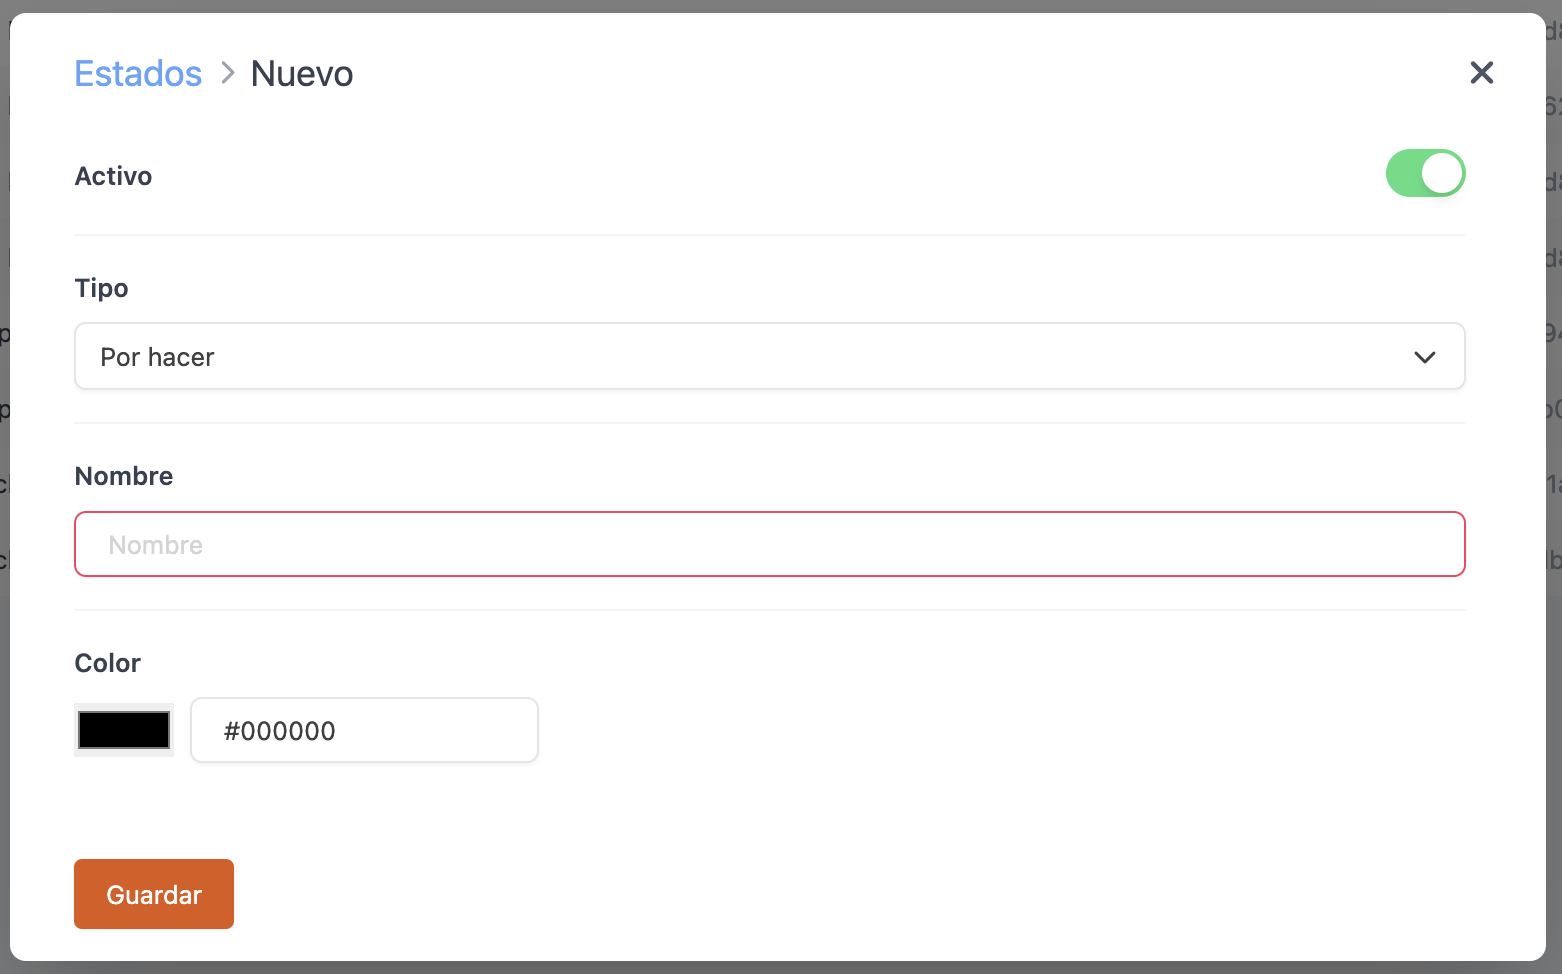
- Type: Choose whether it belongs to the "To Do", "In Progress", or "Done" family.
- Color: Assign a visual color to identify the dish stage at a glance.
- Print: Enable physical ticket printing as soon as this specific status is reached.
4. STATUS WORKFLOW
CHRONOLOGICAL SEQUENCE OF DISHES
A Status Workflow is the mandatory path or sequence a dish follows. You can have one workflow for drinks (Pending → Served) and a longer one for pizzas (Pending → Dough → Oven → Done).
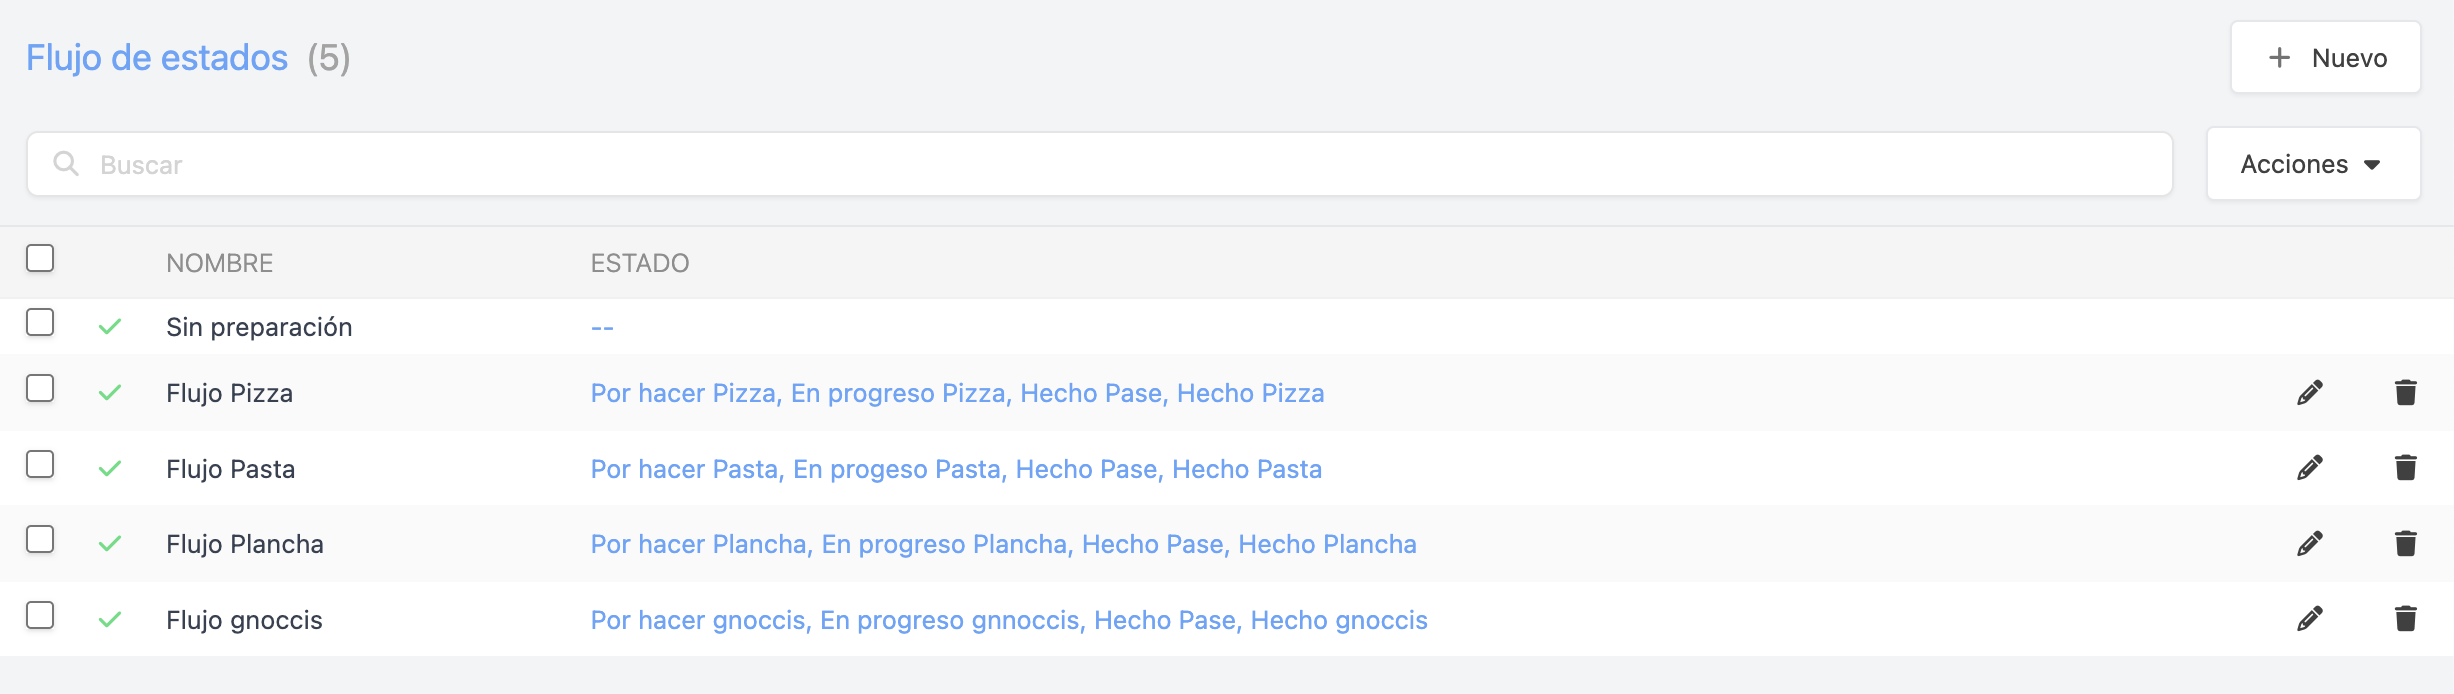
1. Create the Workflow: Click New, enter a name, and click Save.
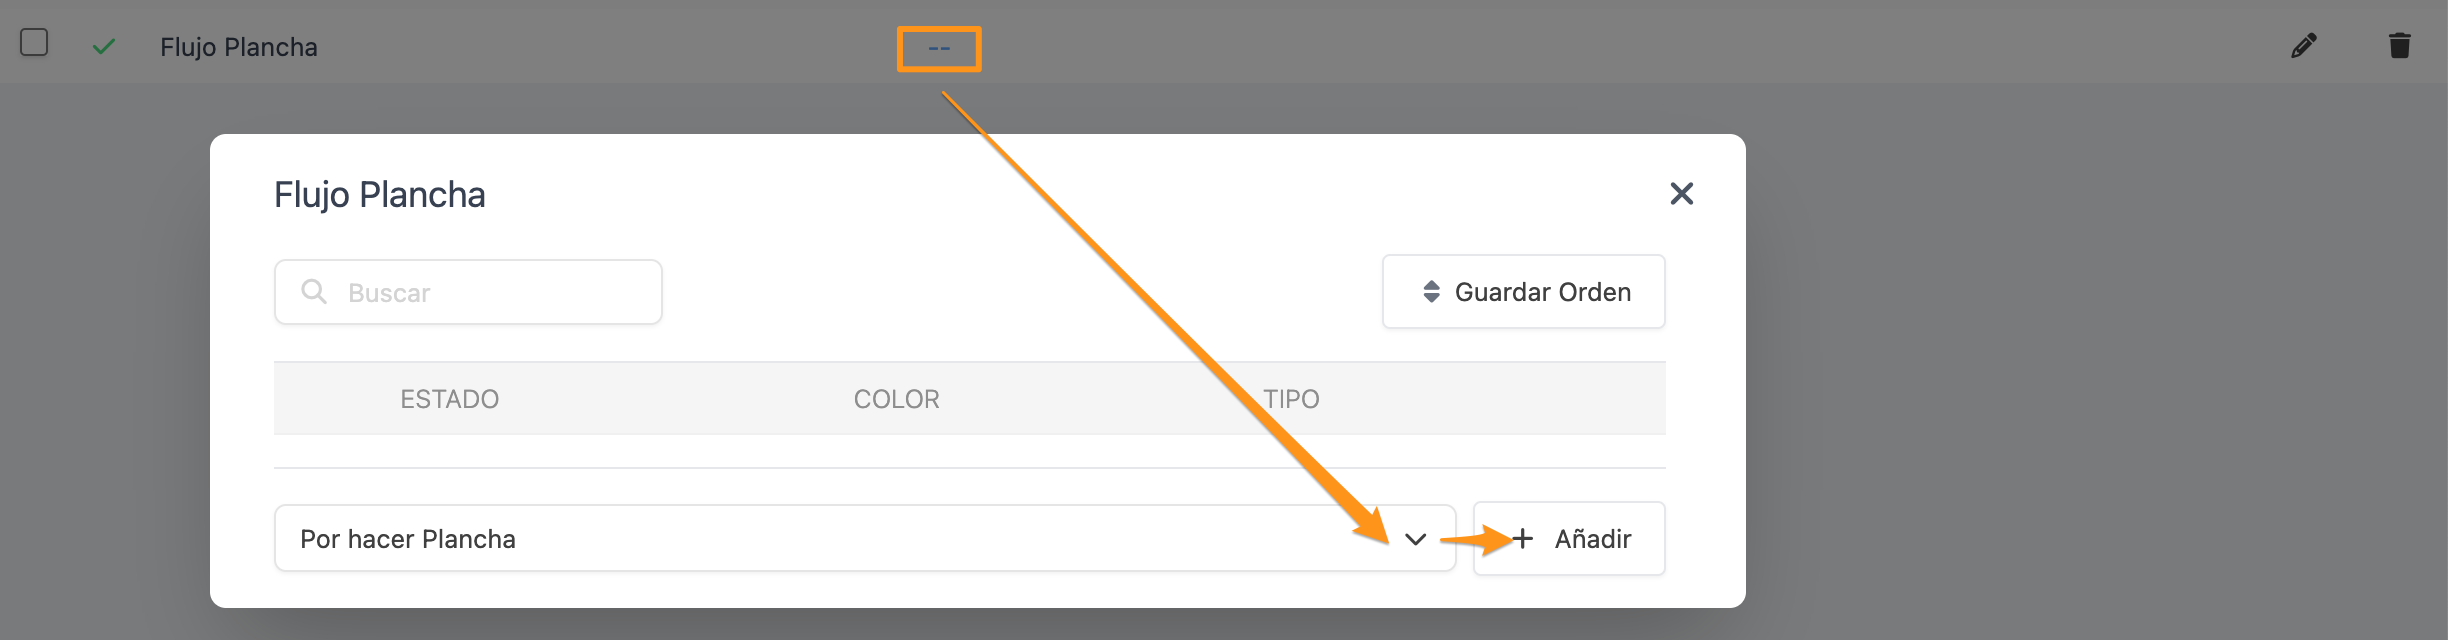
2. Add Statuses to the Workflow: Use the drop-down menu to select the statuses that make up this process and click Add.
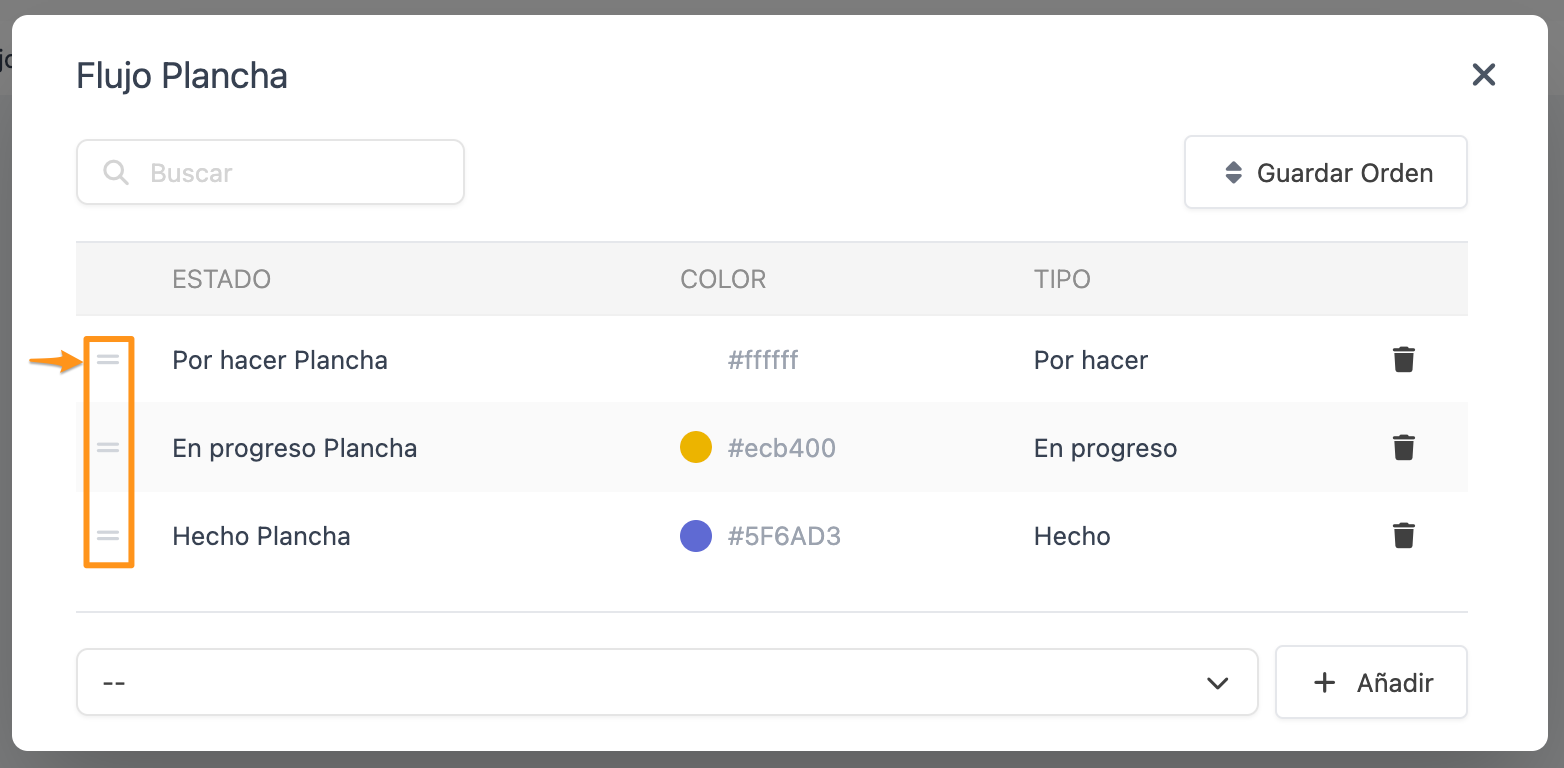
3. Order: Drag from the bar icon to organize the chronological sequence and click Save Order.
ASSIGNMENT TO CATEGORIES
By default, everything uses the workflow configured in general settings. If you want starters to use a different workflow:
- Go to the Revo XEF Catalog and enter the category (e.g., Starters).
- Edit it using the pencil icon and locate the Status Workflow field.
- Select yours and save.
5. PROFILES (BEHAVIORS)
FILTERING BY KITCHEN STATIONS
Profiles allow you to filter what each physical screen displays. For example, the "Cold Station" tablet should only see cold dishes, while the "Expo" screen should see all dishes, but only when completed.
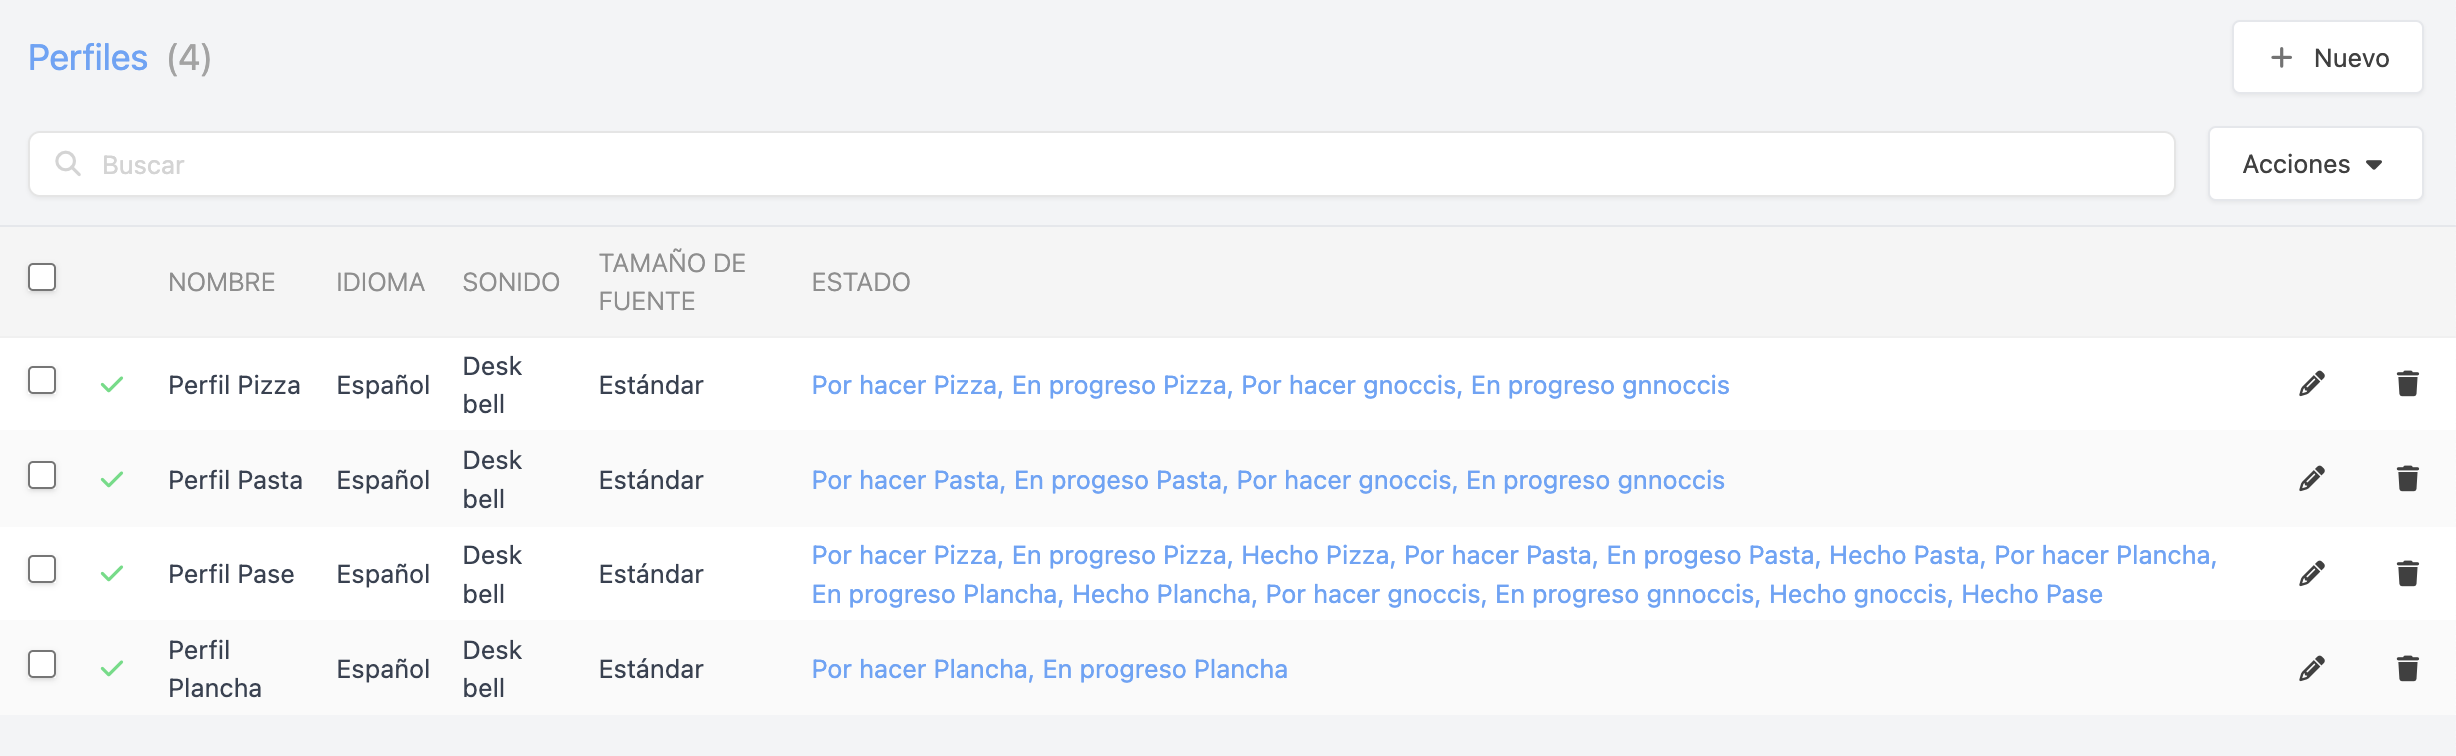
To create a work profile, click New:
| FIELD | DESCRIPTION |
|---|---|
| Name | Logical identifier (e.g., Hot Station Tablet or Bar). |
| Close type | For all: If I close it, it disappears from all tablets. My KDS only: I advance my dishes, but other tablets remain unaffected (Ideal for the main Expo pass). |
| Display | Standard (Grid tickets) or Continuous Flow (Uninterrupted list). |
| Change status on tap | Enables touch interaction with the screen to advance tickets. |
| KDS Coordination | Allows a head chef to see if other stations are falling behind on their dishes. |
| Sound | Customizable audible chime when new orders arrive. |
6. TIME MANAGEMENT
COLOR-CODED VISUAL ALERTS
Revo KDS 2 allows you to activate timers to track exact delay metrics. The ticket timer color will change:
- Green: On time.
- Yellow: About to expire (Warning).
- Red: Overdue time.
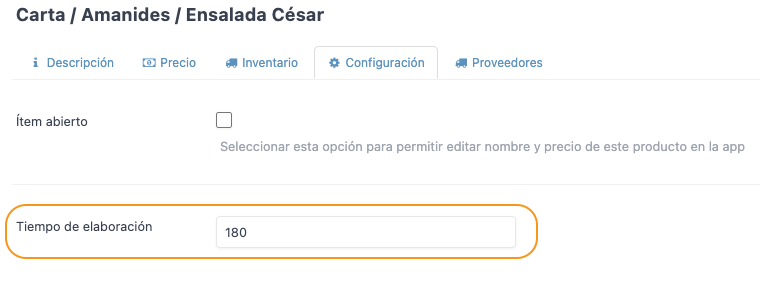
CONFIGURING THE BASE TIME
Specify how many seconds preparation takes directly in the product file (Revo XEF Catalog).
CONFIGURING START RULES
Go to Time Management and associate your rules with a specific Course (e.g., Mains).
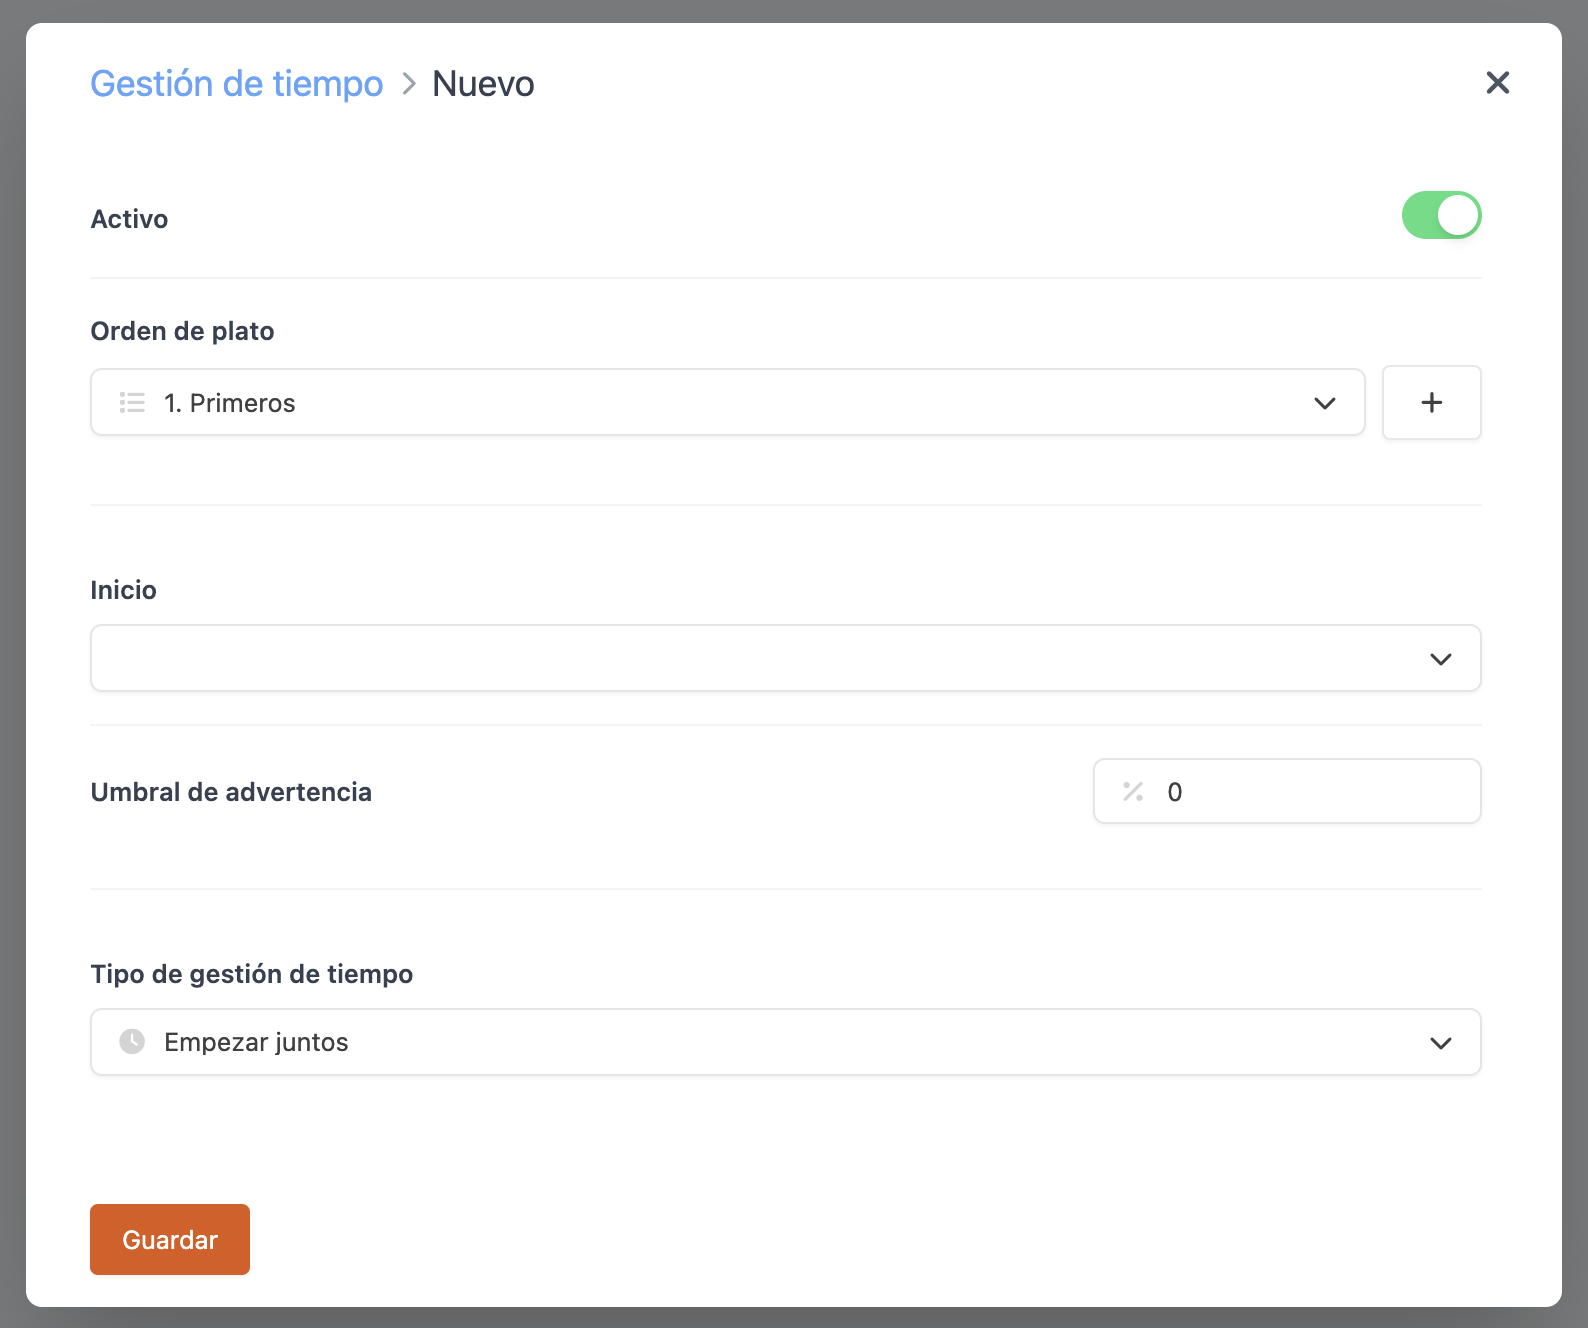
- Automatic Start: Starts upon reaching the kitchen.
- On Fire: Starts only when the server fires the order from the dining room.
- Completing the previous one: Starts the "Mains" timer right when the "Starters" timer closes.
- Start/Finish Together: Choose whether dishes should leave the kitchen coordinated at the same time.
7. KDS NOTIFICATIONS
CHANNELS AND ACOUSTIC ALERTS
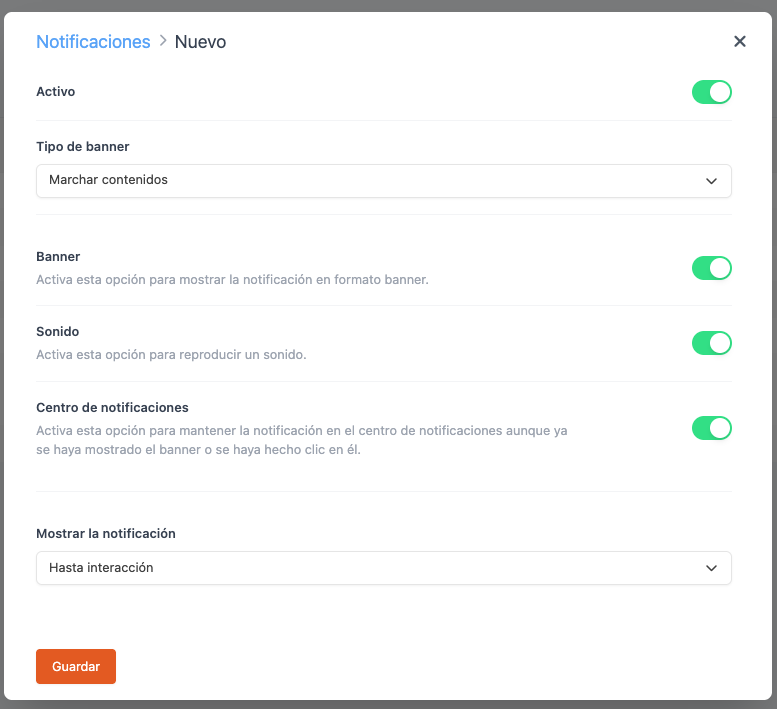
Manage how unexpected kitchen event alerts are displayed and announced by going to KDS 2 → Notifications.
| CONFIGURATION | APPLICATION IMPACT |
|---|---|
| Banner type | Select the trigger event: Fire, Changes, Merge Tables, Cancellations, or Move Contents. |
| Banner | Displays the alert banner at the top of the kitchen tablet. |
| Sound | Triggers the acoustic alarm for each unexpected event. |
| Notification Center | Collects notifications under the bell icon in the app so they aren't missed if a chef wasn't looking at the screen. |
| Show notification | Select whether the alert auto-dismisses (5s, 15s, 30s) or requires user interaction (Until tapped). |